Docker Series: Introduction to Docker

Table of contents
Docker was created in 2013 as an open source project by a foreign company named dotCloud. During the first years of the development, the project grew so much that the company was closed at some point and a new one named Docker, Inc was opened. A decade later Docker became a standard for development of web applications.
Servers became stronger in terms of hardware, but most of the time they were static, that is, without a process that would require that kind of power. This is how virtualisation and virtual machines were born. We started having more and more operating systems on one computer. And, after virtualisation, the cloud was born.
Amazon presented its cloud solution Amazon Web Services also known as AWS. This was a cheap and simple solution for people who wanted to get a big computer power quickly as well as the possibility to scale applications but also to be able to turn that power off if necessary.

Milan Deket
As technology advanced, it was increasingly difficult to develop and maintain applications simply because each application depended more and more on external libraries, specific frameworks or some type of an operating system. As a solution to this problem, dockers and containers were developed. Docker enables organisations to run any application which was packaged in the container regardless of the operating system.
PayPal is one of the bigger companies that introduced a docker. They have over 700 applications which they packaged into containers, without having to change the code itself. This is one of the bigger advantages that enables organisations to easily add Docker to the existing operating system. The only thing that has to be changed is the method of running and packaging of application as well as the way it is transferred across infrastructure.
Lyft is another company that implemented docker in its ecosystem. It is a company that organises transport of passengers, but it also enables anyone to become a driver if he or she owns a vehicle. The problem they had to deal with was a monolith application which was difficult to maintain. When they moved to microservice architecture, their efficiency was limited because they lacked flexibility. In other words, each microservice had to have its own independent ecosystem. At this point, they started using Docker which resulted in a quicker and more efficient service development and maintenance.
Support for operating systems
The first operating system which could support docker was Linux. Windows Server 2016, Windows 10 and macOS were the next three operating systems which supported docker. To run Docker on Windows 10 operating system, Microsoft Hyper-V was necessary. During the installation of Docker on Windows, Docker Desktop Windows installer will automatically enable Hyper-V.
You should use HyperKit for macOS. HyperKit is a lightweight macOS virtualization solution built on top of Hypervisor.framework in macOS 10.10 Yosemite and higher. HyperKit has a few drawbacks, which is why it is still better to use VirtualBox.
Docker CLI
To start using Docker, and create, stop, delete containers and do other activities with them, you first need to check if the docker is installed and which version is installed. The easiest way to do this is from command line, that is from terminal with a command:
docker version
This command will bring back the information on the client and the server. The client is CLI (Command Line Interface) who received a command which we entered into terminal. Server, a docker engine, is a background process or daemon for macOS and Linux, that is a service for Windows. To get more information on the server, we can type in the command:
docker info
This command will give us much more information about what’s happening in our Docker system. Docker has many commands which can be used, which we can see once we type in the command:
docker
We will get all the commands which we can enter in order to get some feedback.
The people who work on the development of Docker realised that the number of commands significantly increased, so they categorised commands into subgroups. The subgroups are listed in Management Commands section. In case you want to use subgroups, the form of the command should look like this:
docker MANAGEMENT_COMMAND COMMAND
Docker image and Containers
Image represents all the dependencies, libraries, code and operating systems which are necessary to run the application. Container is image which was run and which became a process. To start using image and containers, the easiest thing to do is to take image which is ready to be run. The biggest collection for Docker can be found on Docker hub. A web address for Docker hub is hub.docker.com.
Docker Image
Docker image is a file which consists of more layers. It is used to run a container which is described in the file. The file actually consists of set of commands and defined versions of application which need to be run. Also, it can contain various system libraries which will be necessary for running the container as well as the tools and other various files. One docker image can be run in the form of more containers. We can see what the layers of the image look like if we remove that image and issue the command history.
docker image pull nginx
docker image history nginx
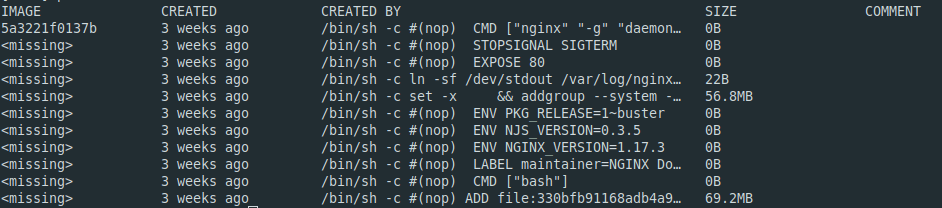
The table in the picture above represents the history of layers created in Docker image for MySQL. Each Docker image begins with an empty layer known as scratch. After that, each command which is carried out is a new layer. Docker image can have one or more layers. When we are making new Docker image, we start with an empty layer, that is scratch. Each new layer has its own unique hash value. This unique hash value helps the system to compare two layers and check if those two layers are the same or different.
Once we have other images defined in Dockerfile there is a possibility that those images have defined Ubuntu as the first layer, and this is when hash values and cached images help. Docker will not remove Ubuntu twice. It will recognise the same hash value and remove Ubuntu image just once in case there is no such image in local cache. This means that if we decide to make Ubuntu the first Docker image with more layers, we should keep only one copy of the Ubuntu image. We benefit the most from this functionality by keeping more space on the hard disc, decreasing the information flow which should go over the net to the Internet and increase the speed of running the containers.
Technically, Docker image does not have its own name. If we issue a command:
docker image ls
We will notice that there is no column named image. Docker image can be identified through image ID, repository and a tag, that is a mark. Tags are similar to git tags. With Docker tag we can actually pull Docker image from a specific commit. If we go to repository for nginx on Docker hub which can be found on this link, we can see what versioning of Docker image looks like in more details.
There is a wide range of versions of nginx which are marked with different tags. If we remove two versions of nginx, nginx and nginx:mainline, we can check their image IDs:
docker image pull nginx
docker image pull nginx:mainline
docker image ls nginx

Although the same image ID has been mentioned twice, this doesn’t mean that that image is saved on the disk two times and that it took up the memory two times for the same data. This means that we have two Docker images stored on one computer. Tags are actually marks that direct you to image ID, and we can have more marks that direct you to the same image.
It is easy to create your own custom image. In our example, we will use image for alpine to create a new one which will contain alpine as a starting image, installed curl and added shell script which will call for some open API. Here is the order of commands:
- docker pull alpine
- docker run -it alpine
Apk add curl
Exit - docker container ls -a
- docker commit -m 'Added curl.' -a 'Milan Deket' CONTAINER_NAME mdeket/chuck-norris
- docker run -it mdeket/chuck-norris
Vi chuck-norris.sh
Chmod +x chuck-norris.sh - docker commit -m 'Added chuck norris executable shell script.' -a 'Milan Deket' CONTAINER_NAME mdeket/chuck-norris
- docker image push mdeket/chuck-norris
- docker login
- docker run -it mdeket/chuck-norris /bin/sh ./chuck-norris.sh
* Docker run command will be explained in the following section.
Users can easily create their own tags. They can take the existing Docker image and mark it as they want. If we want to create a new tag for nginx image, it is enough to issue a command in the following form:
docker image tag SOURCE_IMAGE[:TAG] TARGET_IMAGE[:TAG]
TAG is optional. If you don’t use it, Docker will add value latest. If we perform two following commands we’ll see how Docker marks new images.
docker image tag nginx mdeket/nginx
docker image ls
We can see that a newly created Docker image ‘mdeket/nginx’ has the same image ID as well as nginx and nginx:mainline. It’s a common practice that a new image is marked with a user’s name which the user entered during the registration process on Docker hub. After that, we can save that new image on our repository using the command:
docker image push mdeket/nginx
If, after that command, we go to a user’s account on hub.docker.com, we will see that there is a new image with the name we have given it.
Running a Container
To run a container it is enough to choose image that you want, for example, nginx and to send that onto a command line in the following way:
docker container run –publish 80:80 nginx
Nginx is a web server which can be used in various ways, from reverse proxy, to load-balancer and mail proxy.
Open a browser on the address localhost and you will see a standard homepage of nginx. If you do not enter a version of the image that you want to use, Docker will download the newest one, that is the image with the tag latest. To enter the version you want, you need to type in TAG after the name.
After you have downloaded the image, a new process for a container that was run starts. By using the option --publish 80:80 we tell Docker to direct the entire traffic from the local machine of a user that goes to the port 80 to the port 80 inside of the container, while port 80 is predetermined for nginx which means that the traffic goes exactly where we want it to go, and that’s nginx.
If you turn off terminal, you will also turn off a container, which is something you would not want for your application, because that would mean that it will work as long as the terminal you used to run it is open. This is why Docker introduced the detach option. In other words, the process which was used to run container will not depend on the process of terminal, which means that you will be able to turn off the terminal, and the container will still be working.
The command Docker container run performs many things for you from the moment it is run, and these activities include:
- Researching the local cache in order to find the image which you want to run, and if it doesn’t find it, then it starts researching hub.docker.com
- Downloading the image from hub.docker.com
- Creating a new container based on the image it has downloaded
- Assigning a new virtual IP address in Docker’s private network inside Docker’s engine.
- Running of a container by using a command which was mentioned in Dockerfile
There are many things a user can do to run Docker container, and one of them is to give a name to the container with the option - name. In case the user does not give the name to the container, Docker will do that for it. Essentially, the name assigned by Docker consists of adjective and the name of less known scientists. To list all containers we use command:
docker container ls
If you add option -a to this, all containers will be shown, both the ones that were run and the ones that were stopped.
docker container ls –a
This command will show us more information about current containers in our system. CONTAINER ID will be automatically assigned and it is unique. Also, we will see which image is used to run container as well as which command is performed. We can see when the container was created, the current status, ports and the names of containers.
Comparison of Containers and Virtual Machines
Containers and virtual machines are often compared to one another. There are some similarities, but, in its core, these two concepts are different. Actually, it is very hard to compare the two, because there are many differences between them. Container is just a process. This process is performed on the existing operating system. It has limited resources inside of the operating system and therefore is significantly different from the virtual machine. We’ll show you an example where we’ll run Mongo database by using a command:
docker container run -d mongo
After that, we can list all the processes that the container has run with the command:
docker top CONTAINER_NAME
We will get the list of all the processes with their identification numbers. If we listed all the processes of operating system, this list would also include the process named mongod with the same identification number.
Using of Command Line inside of a Container
We can run a container in the interactive regime by adding the option -it while running the container, for example:
docker container run -it --name proxy nginx bash
It is enough to only add option -it. We also have to add the command which we want to run after running the container itself, which in this case is the command bash which will give us access to the command line inside of the container which was run by nginx. After running the container we will get access to the container with the user root. This doesn’t mean that we got the right to manage the root user on the operating system where the container was run, but on the container itself. If we leave the command line of the container, we can always go back, if the container is still working, with the command:
docker container exec -it proxy bash
*Stay tuned and follow our Docker Series. Next time, you will read more about Docker Network.