Chapter 3. Configuring JENKINS build jobs and security
Table of contents
In the previous two chapters (Chapter 1. Jenkins prerequisites and installation and Chapter 2. JENKINS service account setup and certificates), we have installed JENKINS server and all required tools, we have configured JENKINS service account and we have set certificates and provisioning profiles. So, we have JENKINS server which is fully functional, but we didn't specify anything to be done by it. In this chapter we will show how to create build jobs which will build objective-C projects and then put that build on Test flight and we will show how to set basic security access layer on JENKINS server. The second one is important, but optional (you don't have to do security configuration at all, if default state is ok for you), because by default when JENKINS server is created, all users have a full access rights.
Step 1. Jenkins jobs configuration. This is actually our final goal, to set build of objective-C (XCODE) projects automatically. Therefore, make sure that XCODE plugin is installed as it was instructed in first chapter. To create a new build job, access Jenkins server portal and select action: New Job. When you select this action, following page will be shown.
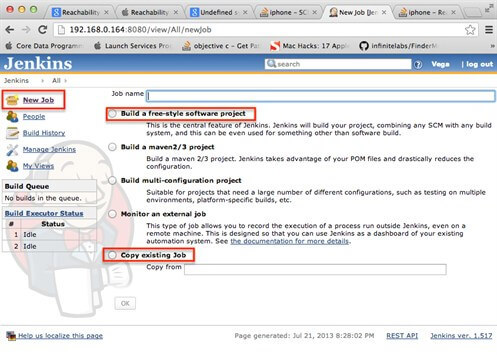
On this page, as you can see, you can choose few templates how to create a new build. If you already have some build jobs created, you can copy body of any build job into your new job by selecting last option:Copy existing Job. Then you can make some additional changes specific to a new job. To create an entirely new job from scratch, you should select first option:Build a free-style software project. When this option is selected Jenkins will show main page for job configuration, like on the picture bellow.
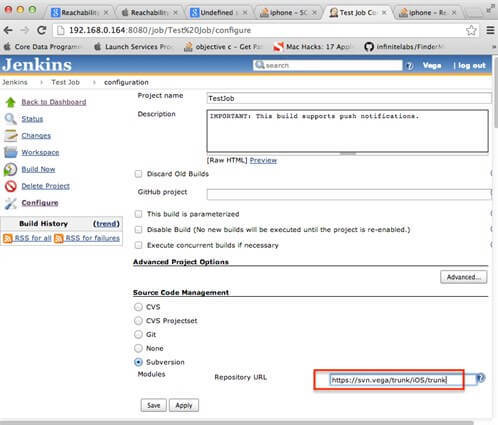
First what should be configured is URL to version control repository where project is stored. We will use Subversion as source code management tool. Please see following picture.
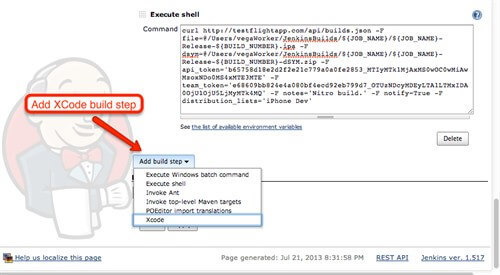
Now, we should add one build step which will specify objective-C project build specification. Therefore, we will add a new XCODE build step (In order to have XCODE build step in interface choice, XCODE plugin has to be installed).
When build step is added, we can specify which project should be build, which schema should be used and similar. You can use Jenkins environment variables to parameterize this. Please take a look on following picture.
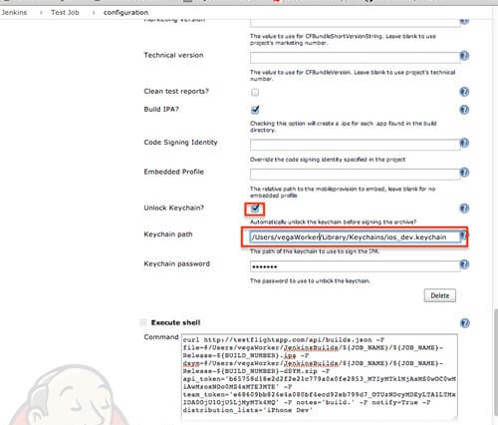
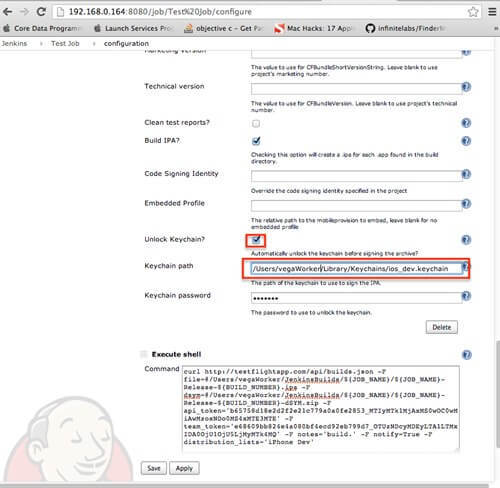
Output directory is something what must be specified. Be aware that entire job is done by the JENKINS service account (in our case vegaWorker), so choose directory location where the JENKINS service account will have write rights. Because, certificates will be needed in XCODE build procedure, you should unlock keychain, created in previous chapter, which contains imported certificates relevant for your project. See picture bellow.
In most cases, when some build server is used, it's combined with some kind of public file storage or something similar. For example Test flight, which is free testing service for mobile developers. In that way, all persons which should see that a new build has arrived will be notified automatically.
To upload build on Test flight server, new build step needs to be added. Type of this step is shell script. Command which will upload build on Test flight is:
curl http://testflightapp.com/api/builds.json -F file=@/Users/vegaWorker/JenkinsBuilds/${JOB_NAME}/${JOB_NAME}-Release-${BUILD_NUMBER}.ipa -F dsym=@/Users/vegaWorker/JenkinsBuilds/${JOB_NAME}/${JOB_NAME}-Release-${BUILD_NUMBER}-dSYM.zip -F api_token='b65758d18e2d2f2e21c779a0a0fe2853_MTIyMTk1MjAxMS0wOC0wMiAwMzoxNDo0MS4xMTE3MTE' -F team_token='e68609bb824e4a080bf4ecd92eb799d7_OTUzNDcyMDEyLTA1LTMxIDA0OjU1OjU5LjMyMTk4MQ' -F notes='build.' -F notify=True -F distribution_lists='iPhone Dev
Let us just say a few important things related to the build jobs. When job is started, Jenkins will print all targets and schemes which can be detected on version control repository. To make some scheme visible for JENKINS server, you should pronounce scheme as a public one in your XCODE environment. Do so, and commit schema files on version control repository. This way, Jenkins will recognize those schemes. Also, you should know that you can add as many build steps as you want in your JENKINS build job, and later it's even possible to change order of those build steps by simple drag & drop technique.
Step 2. As we said in chapter intro, by default JENKINS server is available to any user. Everybody can do anything on the server.So, it highly recommended to setup basic security access layer for JENKINS server. In most cases, there should be one or few administrative accounts for Jenkins server, and one or a few for regular users.
Regular users should have only rights to see and start execution of some build job. Configuration of build job and configuration of JENKINS server should be reserved only for administrators. To open Jenkins security, go to main menu, then select Manage Jenkins and then select action Configure Global Security. This will open window like on following picture.
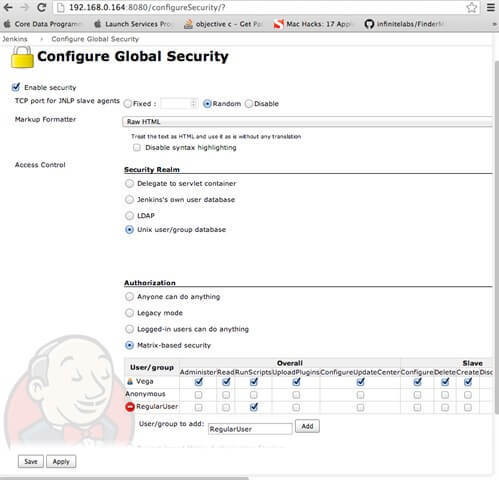
In our example, we are using UNIX based users (regular users defined by Users & Groups tool), which reside in base OS X platform database. So, as access control we will select UNIX user/group database option (But security policy and users can be defined in some third party database also or directory service -LDAP). For authorization we have a few options, for custom setup we will choose Matrix-base security(Like shown on picture above).
In this example, one user account Vega has administrative rights, and one user regular User is regular user. Because security policy can be different from context to context, set access control matrix as you wish.
Be aware that by default, anonymous user has full administrative rights. So it's a good idea to make at least a few security restrictions.